DR.EVIL~TAG
|
![[*]](./images/ultragrey/default_icon.gif) posted on 17-9-06 at 15:57 posted on 17-9-06 at 15:57 |
|
|
Creating a basic Crate
Crate Building
BY
DR.EVIL~TAG
This tutorial will cover the basics of creating a simple crate and placing it in the game. It will include how to name the objects, texture it and how
to convert it to a 3di file to be used in BHD and or JO.
Tools used are as follows:
1: 3DS Max 7
2: Adobe PhotoShop 7
3: BHD OED
4: Texporter latest download
Download Cratetut Zip Here
Reference Materials
Step 1: We will start of by making a very basic crate using a standard primitive that you see with all object editors called a BOX. So first thing you
need to do is click on the CREATE tab (1) and or go through the top menu section. Once you are there select the BOX (2) and then in the top view click
and drag to make your box OR by filling out the Length, Width & Height. For this example I dragged the box but if you want to use the other options
you can use these numbers for a medium size crate in BHD LENGTH = 0.537, WIDTH = 0.54 and HEIGHT = 0.549. Once you have your box made you can name it
01 01 keeps the name short or you can name it 01crate . 01 being the base model.
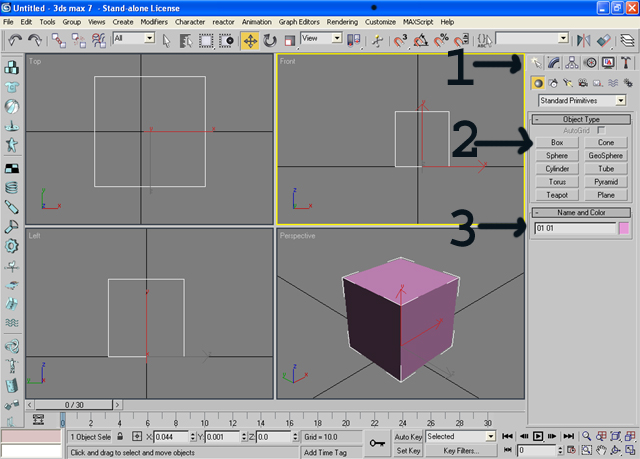
There that was easy enough huh
Now we need to add some texture to it.
Step 2: Select the crate so its highlighted. Now on the select the MODIFY tab. Once you chosen it click on the MODIFIER LIST so it drops down and then
scroll down and choose the UNWRAP UVW
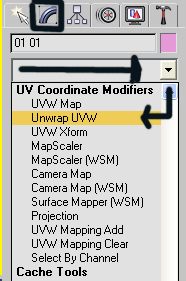
Step 3: Now on the Modify tab after applying the UNWRAP UVW you should now see some new info on the lower part. Select the PLUS (+) sign near the
UNWRAP UVW so it drops down and click on SELECT FACE as shown in picture. Then a bit further down click on the EDIT button. This will open up an new
window.

Step 4: Now you should see 1 huge square in the new window like the one in the image below.
You can leave it like this and save it by skipping down to Step 6 , do this only if you want all the sides to have the same texture if you do not want
the sides to have all the same textures then continue on to Step 5.

Step 5: Ok so now were going to make each side have a different texture. So in the window you had open above you should see a MAPPING button on the
top. Click on it and choose FLAT MAPPING.

Now a new window will appear, Just click ok on it. You should now see all the face of the crate separated .
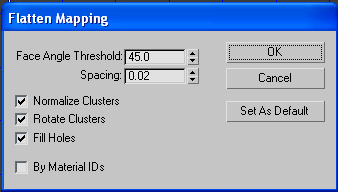
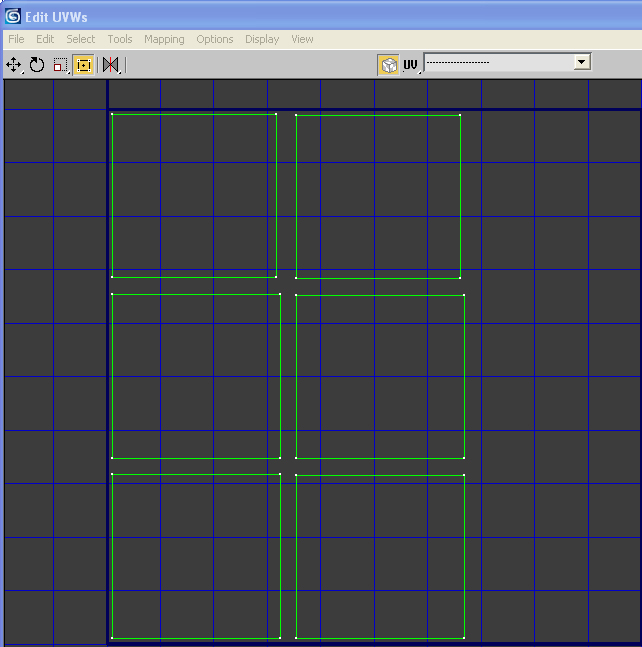
Now you can also do as you did in Step 4 and save this image and texture it like this by skipping to Step 6 but for me Im going to take it one step
further. So if you want to you can carry on to the next step.
So now that we have this layout we need to find out what is what for side. IE = TOP , Bottom , LEFT , RIGHT , FRONT , and BACK.
So to do this were going to move the small window of to the one side a bit so we can see the perspective view and the small window at the same time.
Now in the perspective view click on a face and you will see it select it in the small window as shown in the picture. Once we know which is the top
we can move it off to the side as show in the next picture.
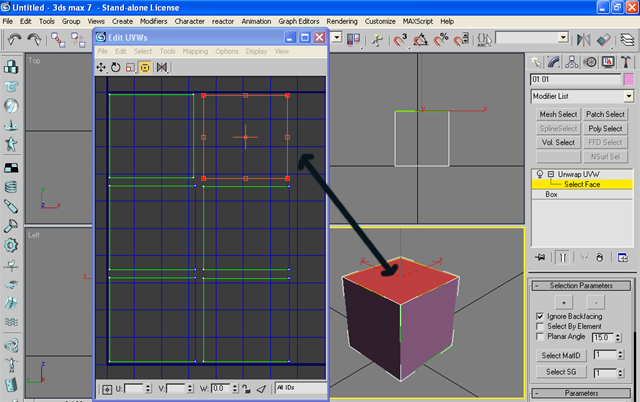
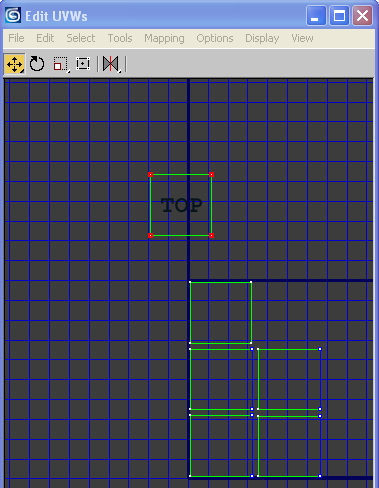
We will continue doing this till we figure out what side is what in the UVW window. Now to do this you dont need to use the perspective window the
whole time you can switch back and fourth between them all. In the end you should have something layed out like the image below.
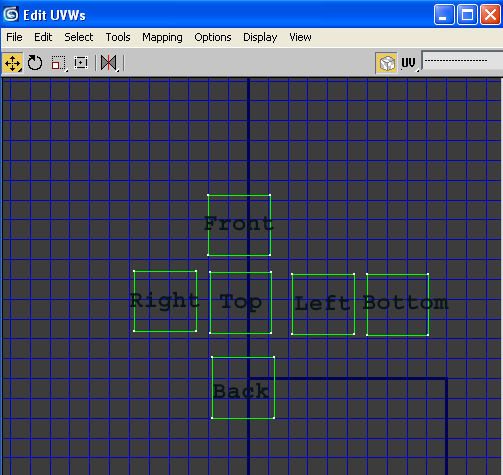
Now we will take all these and stitch them nicely together forming one complete texture. So this is where it gets a bit tricky. Some of the boxes in
the UVW editor will need to be rotated to be stitched to the right side. So lets stitch the FRONT box to the TOP box first. So what need to do is see
which face is lined up with the top 2 vertices in the TOP box shown in the white circles. So in the FRONT box you just have to highlight 2 vertices at
a time to see which ones turns the top side blue shown by the number 3. As you can see it was the 2 on the right side. But now we have a problem there
not lined up so we have to rotate the FRONT box so there lined up. NEVER rotate the TOP box this is our centre point.
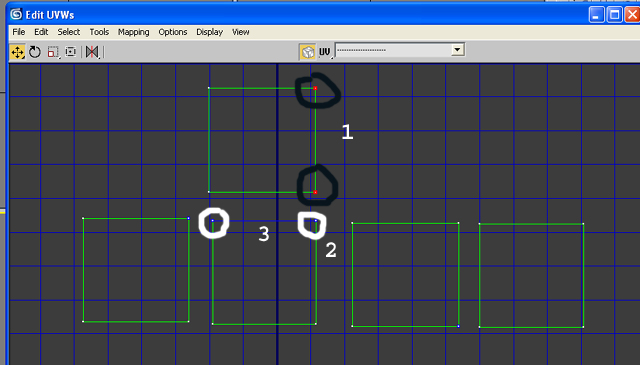
So highlight all the vertices in on the FRONT box. Shown with the big white circle around them. Then in the top corner select the ROTATE button. Now
rotate the FRONT so that the number 1 is lined up with number 2.
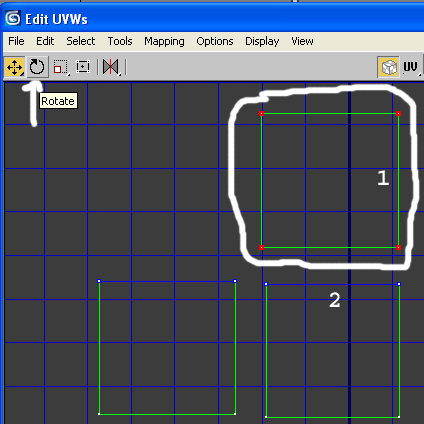
You should now have it so when you select the bottom 2 vertices that the top line on the TOP box turns blue. IF you do not have it so when you select
the BOTTOM 2 vertices on the FRONT box then you must turn the box again.
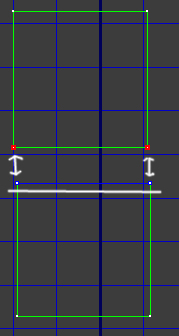
If you do then leave them highlighted and go to TOOLS and select the STITCH SELECTED .

A new window will appear with default settings , Just click OK
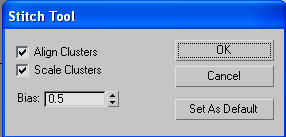
Once you done that you should see the 2 boxes become attached. As seen in the next picture.
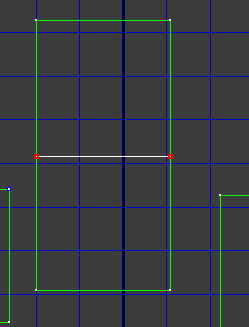
Now we will continue on with the other sides, Rotating them and stitching them accordingly. The end result should look something like the image below
.

Now you can change it around a bit depending on where you want to attach the sides to, But REMEMBER the side your stitching must be facing the BLUE
line on the other face or it will turn out wrong.
Now we drag a box around the entire thing and scale it down to fit with in the little DARK BLUE box.
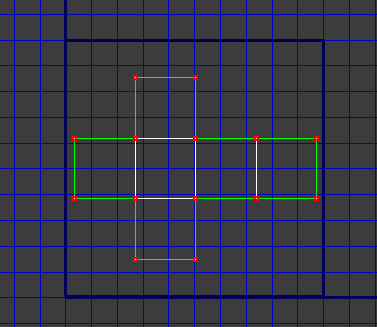
OK all done with this part for now. So you can close it out.
Step 6:
Now you need to click on the little hammer icon titled UTILITIES (1) , Then click on MORE (2)
Scroll down to the list till you see TEXPORTER (3) then click OK (4)
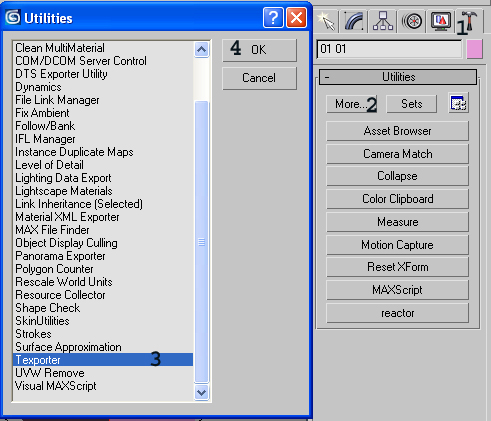
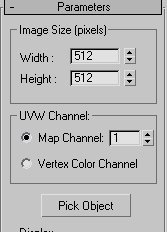
OK now under the hammer tab still a you will now see a PARAMETERS part. Here you will place in the size of the texture you want to use, For this one I
chose 512 by 512. Next click on the PICK OBJECT and then click on the CRATE
Ok now a new window opens up showing you the texture you just put together at the beginning of this step. Now click on the disc icon at the top and
save it in TGA format.
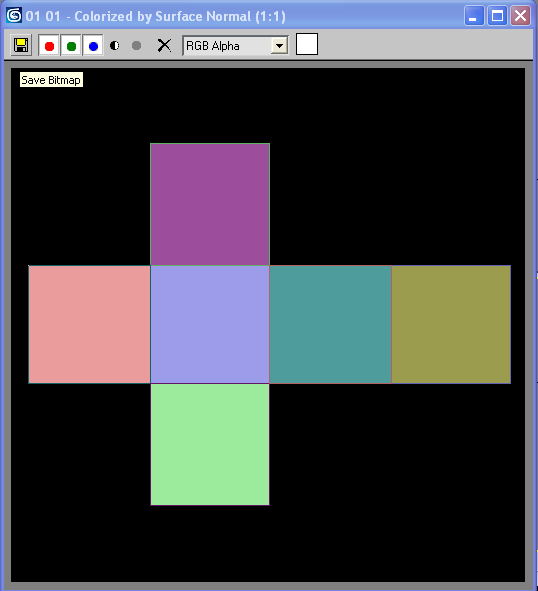
Now take the texture and place it into you art program and place a nice texture in the template you just saved.
Example below
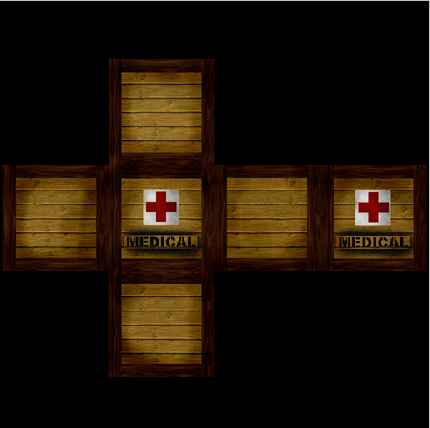
Step 7: Ok our texture is all done, Now lets import it and apply it to the crate. So hit the letter M on the keyboard. This is a short cut to the
MATERIAL EDITOR. Once you have it open just DRAG the texture file from its file folder you saved it in , Into the material editor and place it into
the first ball in the top corner as seen in the picture.
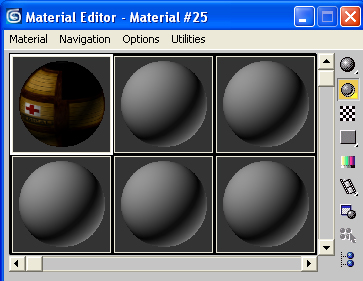
Then once you have it showing on the ball in the editor , Click on it again and drag it over and place it onto the crate. If the texture is good then
you can carry on to the STEP 8 if the texture is not sitting properly click onto the MODIFY tab again and then click on the UNWRAP UVW EDIT button
like you did a way above when you were attaching the boxes together.
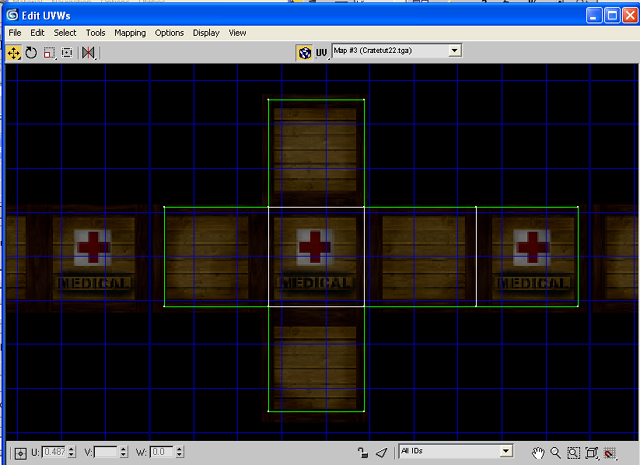
Once your in the edit section again you can move the vertices to line up with the box properly. But if done right the first time then it should appear
like the image below right off the bat.
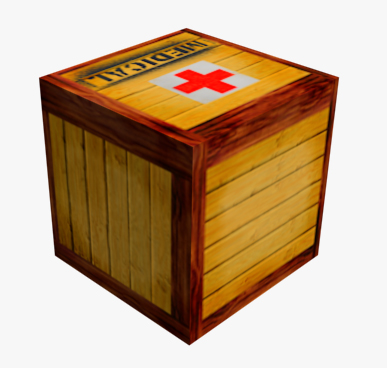
Step 8 : Ok we now have our base box and its named accordingly, So now we have to make a collision box so the character cant walk through it in the
game. To do this just click in the TOP view. Then click on the CREATE tab like you did for the first box. Select BOX and make one the exact same size
as you did for the first one either by dragging it in the screen and or putting the numbers in. Then name is CB01. While the CB01 is still highlighted
right click and select HIDE SELECTION, this will then hide the collision box out of view.
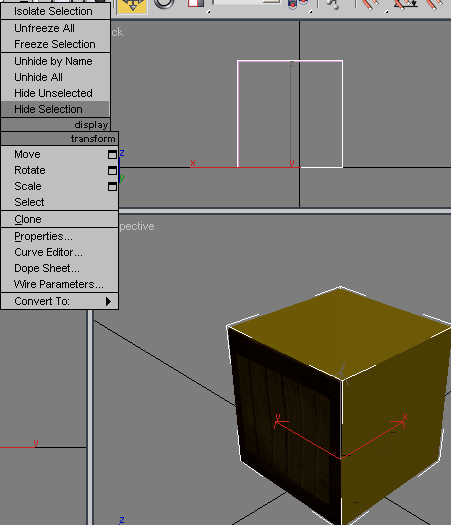
STEP 9: Now we will create a small box and title it UPG01 this will be known as the ground point for the item. So repeat Step 8 for the first part but
making the box really small.
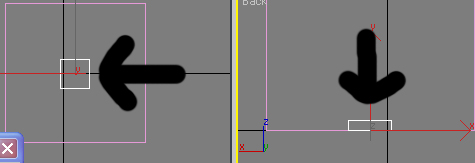
Yea were all done with the crate in the modelling program unless you find that once you get it in the game its to big or to small then its just a
matter of coming back into here and doing some scaling work.
So now save it as a max/3ds file as well as an ASE file.
Now were moving onto the BHD OED tool. So let fire it up.
OED
Step 1: Launch the tool. And check the 1m box

Now import the ASE file.
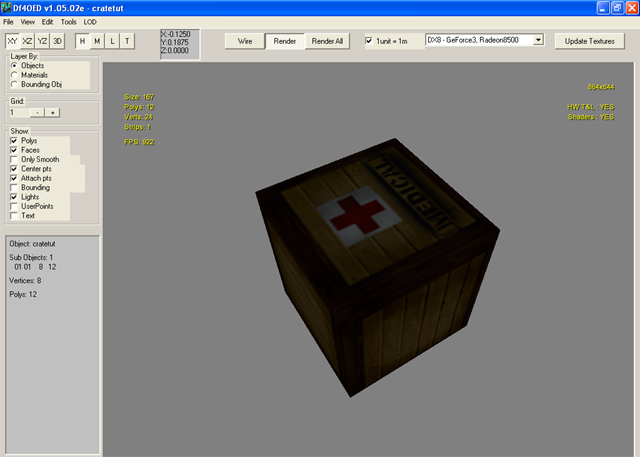
Step 2: Now we need to make the texture react like a piece of wood , so go to the EDIT tab at the top of the OED and then select EDIT MATERIAL , Once
in there select the crate texture at the top and then in the lower left corner under PHYSICAL ATTRIBUTES select WOOD.
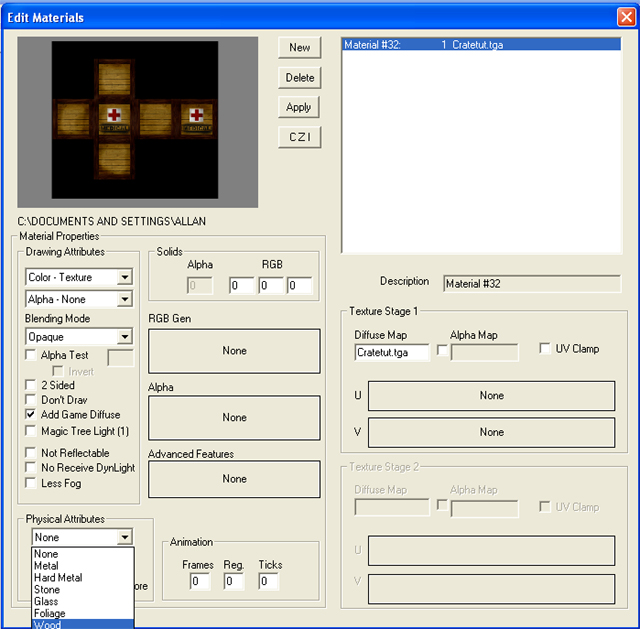
Export the item as a 3di file. And then we can test it in the game.
Setting up the items.def file and importing it in the game please read the BHD tool manuals on this process.
Download Cratetut Zip Here
|
|
|
DR.EVIL~TAG
|
![[*]](./images/ultragrey/default_icon.gif) posted on 17-9-06 at 17:32 posted on 17-9-06 at 17:32 |
|
|

|
|
|
privateSAS
Corporal
Posts: 476
Registered: 10-9-06
Location: Europe, Slovenia
Member Is Offline
Mood: Stressed
|
![[*]](./images/ultragrey/default_icon.gif) posted on 26-11-06 at 09:39 posted on 26-11-06 at 09:39 |
|
|
Hmmm...how do you add the pic as a material in OED?
|
|
|
Eagle_Eye
|
![[*]](./images/ultragrey/default_icon.gif) posted on 26-11-06 at 10:00 posted on 26-11-06 at 10:00 |
|
|
In The OED, step 1, you must set your path before you open the model..
Under tools/options...set a path to the folder where your model (xyz.ase) and your material (xyz.tga) files are stored..
EE
|
|
|
privateSAS
Corporal
Posts: 476
Registered: 10-9-06
Location: Europe, Slovenia
Member Is Offline
Mood: Stressed
|
![[*]](./images/ultragrey/default_icon.gif) posted on 26-11-06 at 19:59 posted on 26-11-06 at 19:59 |
|
|
OK....another problem...
Im stuck at the step 4, where you have to stich the sides together. The tutorial is for Max v7, but I have v8, so whenever I try stiching, I screw up
the sides...
|
|
|
DR.EVIL~TAG
|
![[*]](./images/ultragrey/default_icon.gif) posted on 4-12-06 at 11:16 posted on 4-12-06 at 11:16 |
|
|
Remember you don't have to stich them up if you don't want to. You can lay them out as seperate sides and then texture them.
I'm not sure how v8 is set up as theres always some major changes in the newer versions how ever a little playing around and I'm sure you will get
them.
Stiching them up just makes it look neater but as I said you do not need to stitch them up at all, Just seperate the sides so you can tell them apart
from each other. And those you want to be the same just place them over each other and leave the others ones with seperated.
|
|
|
AssassinXaero
Corporal
Posts: 316
Registered: 24-7-06
Location: Missouri, USA
Member Is Offline
Mood: No Mood
|
![[*]](./images/ultragrey/default_icon.gif) posted on 15-2-07 at 10:52 posted on 15-2-07 at 10:52 |
|
|
Small problem... texporter link didnt work for me... said Not Found Error or something like that...
|
|
|
DR.EVIL~TAG
|
![[*]](./images/ultragrey/default_icon.gif) posted on 15-2-07 at 12:45 posted on 15-2-07 at 12:45 |
|
|
Ahh sorry bro its because the txpsite was redid.
Heres the link to them now.
http://txpgone3d.com/files.php?action=category&id=5
I'll fix the link inthe above post
|
|
|
privateSAS
Corporal
Posts: 476
Registered: 10-9-06
Location: Europe, Slovenia
Member Is Offline
Mood: Stressed
|
![[*]](./images/ultragrey/default_icon.gif) posted on 9-4-07 at 18:56 posted on 9-4-07 at 18:56 |
|
|
Btw, when I try to select the lines to stich them, it always deselects one, when I choose another...so how do you stich them right?
And can some turn this into a .pdf file, so I can print it out and read it "offline"? I always forget, what to do, when I open up Max 
|
|
|
Eagle_Eye
|
![[*]](./images/ultragrey/default_icon.gif) posted on 9-4-07 at 18:58 posted on 9-4-07 at 18:58 |
|
|
Why not select the printable version..
http://www.dfreload.com/forum/viewthread.php?fid=64&tid=350&action=printable
|
|
|
privateSAS
Corporal
Posts: 476
Registered: 10-9-06
Location: Europe, Slovenia
Member Is Offline
Mood: Stressed
|
![[*]](./images/ultragrey/default_icon.gif) posted on 9-4-07 at 20:39 posted on 9-4-07 at 20:39 |
|
|
Printed...but must say, that the tutorial makes up a small book...lol
|
|
|
Chrispy
Staff Sergeant
Posts: 997
Registered: 28-10-06
Location: Peria, New Zealand
Member Is Offline
Mood: 
|
![[*]](./images/ultragrey/default_icon.gif) posted on 7-7-07 at 12:38 posted on 7-7-07 at 12:38 |
|
|
Crap this 3DS Max modding has caused me plethoras of stress... OMFG!
At the real last part, in the OED, I can't select the Physical Attributes part... greyed out...
Damnit!
Chris 
|
|
|
Eagle_Eye
|
![[*]](./images/ultragrey/default_icon.gif) posted on 7-7-07 at 15:24 posted on 7-7-07 at 15:24 |
|
|
You need the "Other" oed...there's a copy on disk 10 in the ones I sent you.. df4oed_mat.exe
|
|
|
Chrispy
Staff Sergeant
Posts: 997
Registered: 28-10-06
Location: Peria, New Zealand
Member Is Offline
Mood: 
|
![[*]](./images/ultragrey/default_icon.gif) posted on 7-7-07 at 16:43 posted on 7-7-07 at 16:43 |
|
|
Awesome, I'll get to this tomorrow. Before seeing this post, I opened up the tutorial .zip and opened up the .ase Doc made - and it was the same
(couldn't select physical attributes). So I started thinking it was the OED, and not the .ase.
Chris 
|
|
|
Chrispy
Staff Sergeant
Posts: 997
Registered: 28-10-06
Location: Peria, New Zealand
Member Is Offline
Mood: 
|
![[*]](./images/ultragrey/default_icon.gif) posted on 8-7-07 at 12:20 posted on 8-7-07 at 12:20 |
|
|
For doing the ITEMS.def entry, add this (directed to the newcomers of DF modding):
begin "My Crate"
id 104101
type decoration
graphic crate01
end
The ID number MUST be a number that hasn't been used before in any other items.
The type should generally be decoration.
The graphic name is the file name of your .3di. If it's called crate01, put in crate01 - if it's not, put in whatever filename
your .3di is.
Your .3di and .dds/.tga should be put into your mod .pff - or alternatively put into the DFBHD directory with the ITEMS.def file, running the /d
(DON'T go into NW servers if you have the /d running with custom files in your directory!)
To run the /d, you must add /d at the end of the target line of your DFBHD shortcut. Mine's like this:
"C:\Games\NovaLogic\Delta Force Black Hawk Down\DFBHD.EXE" /d
Right-click your DFBHD shortcut, go to Properties, and you'll see the directory line there. Afterwards, hit Apply, and off ya
go!
Chris 
|
|
|

